To set up LXC in Proxmox, download a supported Linux system-container template, create an unprivileged container, choose its storage and network, and start it. Install packages inside the container, then verify the service from another device. Before adding important data, decide how you will back it up and restore it.
This walkthrough builds a small Debian web server with its files inside the container’s root disk. Keeping that first layout simple makes it easier to understand what Proxmox manages and what a container backup can recover.
Scope and validation: this guide covers an existing standalone Proxmox VE 9 host and a Debian 13 system-container template. Sources were checked on November 8, 2026; the Proxmox manuals read identify themselves as 9.2.13. The procedure has not been executed on a test host. Confirm template availability, exact host build, firewall behavior and restore results on a separate lab before relying on this procedure.
Know what a container shares with the host
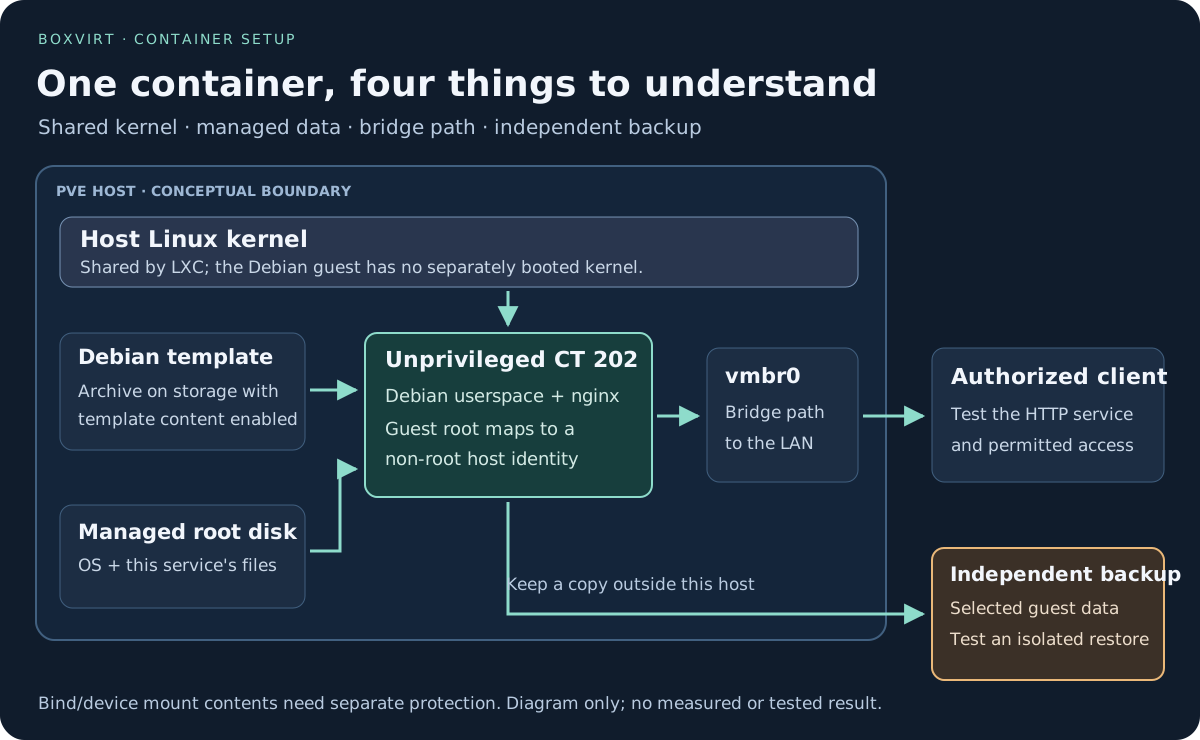
An LXC system container provides a Linux userspace while using the Proxmox host’s kernel. You do not attach an installer ISO or install a separate kernel as you would for a VM. Windows and FreeBSD therefore need a suitable VM rather than a Proxmox LXC container.
With an unprivileged container, guest root maps to an unprivileged identity on the host. That reduces the authority of processes inside the container. It does not provide a separate kernel or remove the need to maintain the host. See the Proxmox container guide and the existing VM or LXC decision worksheet if your application needs special devices, kernel modules or stronger separation.
This article uses a traditional Debian system-container template. It does not use an OCI application image or install Docker inside LXC. Those paths add different compatibility and privilege questions.
1. Choose a small, explicit starting configuration
The values below are an illustrative lab plan, not a measured sizing recommendation. The private addresses describe one example LAN. Substitute your actual bridge, unused guest ID, free address, gateway and DNS server.
| Setting | Example | Why it matters |
|---|---|---|
| Container ID | 202, after checking it is unused | PVE uses the ID to identify configuration and tasks |
| Hostname | web-ct | Gives the container a recognizable name |
| Template | Current Debian 13 standard system template | Supplies Debian userspace; record the exact archive used |
| Unprivileged container | Enabled | Uses host user-namespace mapping for guest root |
| Root disk | 8 GiB on suitable managed storage | Holds OS, packages and this example’s small web page |
| CPU | 1 core | Example CPU allocation, not a dedicated physical core |
| Memory | 1024 MiB | A usage limit, not an exclusive host reservation |
| Swap | 0 MiB for this example | No container swap allowance; review for the actual workload |
| Network | eth0 on existing vmbr0, no VLAN tag | Uses the already-working untagged lab LAN |
| IPv4 | 192.168.40.22/24 | Must be unused and excluded from conflicting DHCP allocation |
| Gateway | 192.168.40.1 | Assumes this LAN router provides the route off the subnet |
| DNS | 192.168.40.1 | Assumes that same router actually provides DNS to this LAN |
Check the host’s resource headroom using the RAM planning guide. Container memory and swap controls are limits under the host’s cgroup system. A swap allowance cannot create swap space that the host does not have. Hitting a memory limit can result in processes being killed; a stopped web service may be a resource problem rather than a network failure.
Use an existing working bridge. This walkthrough does not change the host’s management address, build a new VLAN or configure NAT. A bridge alone does not provide DHCP, routing or DNS. See Proxmox networking for that distinction.
2. Download a system-container template
In the PVE web interface, select storage that supports Container template content, open its template list and download the current Debian 13 standard template offered for your host architecture. The interface commonly labels this section CT Templates.
Record the exact archive name. Do not copy an old template filename from a tutorial: template revisions change independently of this article. Confirm Debian’s support status in the release information.
If Debian 13 is not offered, stop and check the host’s updates and template catalog rather than fetching an arbitrary archive from a third-party script. You can inspect the available catalog on the PVE host with:
pveam available --section system
The template archive and the container’s running root disk are different
objects. For example, a Directory storage ID such as local may hold the
download, while local-lvm holds guest volumes. LVM-Thin does not become a
template library because its name contains “local.” The
storage comparison explains content types.
3. Create the unprivileged container
Select Create CT and work through the wizard:
- Choose the intended node and an unused CT ID. Set
web-ctas the example hostname. Keep Unprivileged container selected. Set a strong, unique root password for the console login used below. You may also add an SSH public key for planned SSH access; that key does not replace a password at the console login prompt. Keep credentials out of shared notes and screenshots. - Select the Debian system template you downloaded.
- Place the root disk on the selected managed guest storage. For this example, allocate 8 GiB. Confirm free physical capacity as well as the virtual disk size.
- Set the example CPU, memory and swap limits. Leave additional features such as nesting, device access and FUSE disabled for this basic service.
- Configure
eth0, the existing bridge, IPv4 address/prefix and gateway from the worksheet. Leave the VLAN tag empty only because this example uses an untagged bridge path. Enter the intended DNS server explicitly. - Review the final configuration before creating the guest. Initially leave automatic start at host boot disabled so you can finish checks before adding a startup dependency.
For the IPv4-only worksheet, leave IPv6 configuration on Manual rather than requesting a routable address. This does not disable the IPv6 stack or constitute a firewall policy. If your real LAN provides routable IPv6, configure and test its permitted paths alongside IPv4.
Retain your intended Proxmox firewall policy. The NIC’s Firewall checkbox is only one control in that system; it does not create the application’s allow rules or prove isolation. Define and test the permitted client-to-service path before treating the guest as reachable only by selected users.
After creation, read the configuration on the PVE host, substituting the actual ID:
pct config 202
Check that unprivileged: 1 is present, the intended root storage is used,
and net0 has the right bridge, address and gateway. A wrongly selected
storage or address is easier to correct now than after the service holds
important data.
4. Start Debian and verify its network
Start the container, open its console in PVE and log in as root with
the password you set in the creation wizard. The following commands run
inside the Debian container, not in the node’s host shell:
cat /etc/os-release
uname -r
ip -br address
ip route
cat /etc/resolv.conf
Expect Debian 13 userspace, the planned IPv4 address on eth0 and the
correct default route and resolver. uname -r reports the shared host
kernel; a different Debian userspace version does not imply an independently
booted guest kernel.
Use hostname resolution to check DNS:
getent ahosts deb.debian.org
If the address or route is wrong, correct the container’s PVE network configuration before editing competing network settings inside Debian. If addressing is correct but name resolution fails, inspect the configured resolver and its reachability. DNS failures and routing failures need different fixes.
Refresh the package lists in the container:
apt update
Resolve failures before updating packages:
apt upgrade
These are guest maintenance commands. They update the container’s packages, not the Proxmox host. Read the proposed transaction and any prompts; Debian’s APT manual describes package operations and error handling.
5. Install one small service and test both ends
Inside the container, install Debian’s packaged nginx and curl:
apt install nginx curl
Keep this demonstration private: the page contains no credentials and does not publish PVE administration or open an internet-facing port. Configure HTTPS and application access controls separately before hosting sensitive content.
Check the nginx configuration, using its documented configuration test:
nginx -t
If the test succeeds, enable and start the service inside the container:
systemctl enable --now nginx
Request the local page:
curl --head http://127.0.0.1/
For the unmodified default site, expect an HTTP 200 response. Read the
status line: curl can complete a connection successfully while the server
returns an HTTP error such as 404 or 500.
Now, from an authorized device on the example LAN, test the container address instead:
curl --head http://192.168.40.22/
A successful local response proves something different from a successful
remote response. The latter also exercises the guest NIC, bridge path and
firewall policy. Expect the same default site and HTTP 200 from the allowed
client. Use the real assigned address rather than copying the example onto
an unrelated network.
Restart the container through PVE, reconnect and repeat the requests. This checks that the service starts again and the intended address survives a guest restart. You do not need a QEMU Guest Agent for this system container.
6. Know which data the backup includes
For the first version of this service, keep its web content and configuration inside the managed root disk. When adding a data mount later, make the backup decision at the same time:
| Where the data lives | What to check |
|---|---|
| Managed root disk | Check the guest backup job and its completed contents |
| Additional managed storage volume | Explicitly check the mount’s Backup option; inclusion is not automatic |
| Host directory exposed through a bind mount | Its contents are excluded from the ordinary container backup; protect them separately |
| Device mount or external service | Establish its separate backup and consistent recovery procedure |
The Proxmox backup manual distinguishes these cases. A backup job showing success does not establish that a bind-mounted directory was copied. A ZFS-backed volume managed by PVE should not be confused with an arbitrary host-directory bind mount.
Guest snapshots are useful for certain short-lived changes, but copies on the same failed storage cannot provide independent recovery. Use a backup destination that remains accessible after losing the host or its local pool. Review the backup and restore checklist before storing important content. For a separate backup server, the PBS setup walkthrough covers the datastore, connection and first recovery check.
Test a restore under a different identity
In PVE, select the intended backup storage and create a backup of the container. Choose a supported mode for the actual storage and consistency needs. Snapshot-mode LXC backups require snapshot support for all included volumes; do not infer that capability from a VM’s successful live backup.
Then restore to a different unused CT ID on a suitable lab target. Keep the restored container’s NIC disconnected from the production LAN before its first start: a restored static address can conflict with the original. Inspect its configuration and service locally, then use an isolated test network or a deliberately reassigned identity for a remote test.
Confirm the expected files and configuration are present, nginx starts and the page can be read. Reconnect or publish nothing automatically. For an actual application, add its database, authentication and external-data checks to this procedure.
Troubleshoot the failing layer
| Symptom | What to check first |
|---|---|
No usable eth0 address | PVE NIC settings, selected bridge, intended static configuration or DHCP service |
| Address works locally but remote requests fail | Listener, firewall rules and the client’s bridge/VLAN/routed path |
Local IP services work but apt update cannot resolve hosts | Guest resolver configuration and DNS reachability |
| Service disappears under load | Memory limits, guest logs and the host’s available resources |
| Added bind mount is not writable | Guest/host identity mapping, permissions and mount read-only flags |
| Restore starts but files are missing | Backup exclusions and data outside the managed root disk |
For host-directory permissions, establish the numeric UID/GID mapping and the application’s real service identity. Do not solve the problem by switching to privileged mode or making every file world-writable.
Once network, service and restore checks pass, set a deliberate host-boot startup order if needed and record the template, resource limits, data locations and backup policy. The useful result is a container you understand well enough to maintain and recover.