To configure the Proxmox firewall, enable it at the datacenter level, check the host settings, then enable the guest firewall and its network interface flag. Build the rules before applying a restrictive policy. Test new connections from an allowed client and a client that should be blocked.
There is one detail that often causes confusion: rules protecting the PVE host and rules protecting a guest apply to different traffic. Blocking an incoming connection to the host does not automatically block that same port on a VM connected to its bridge.
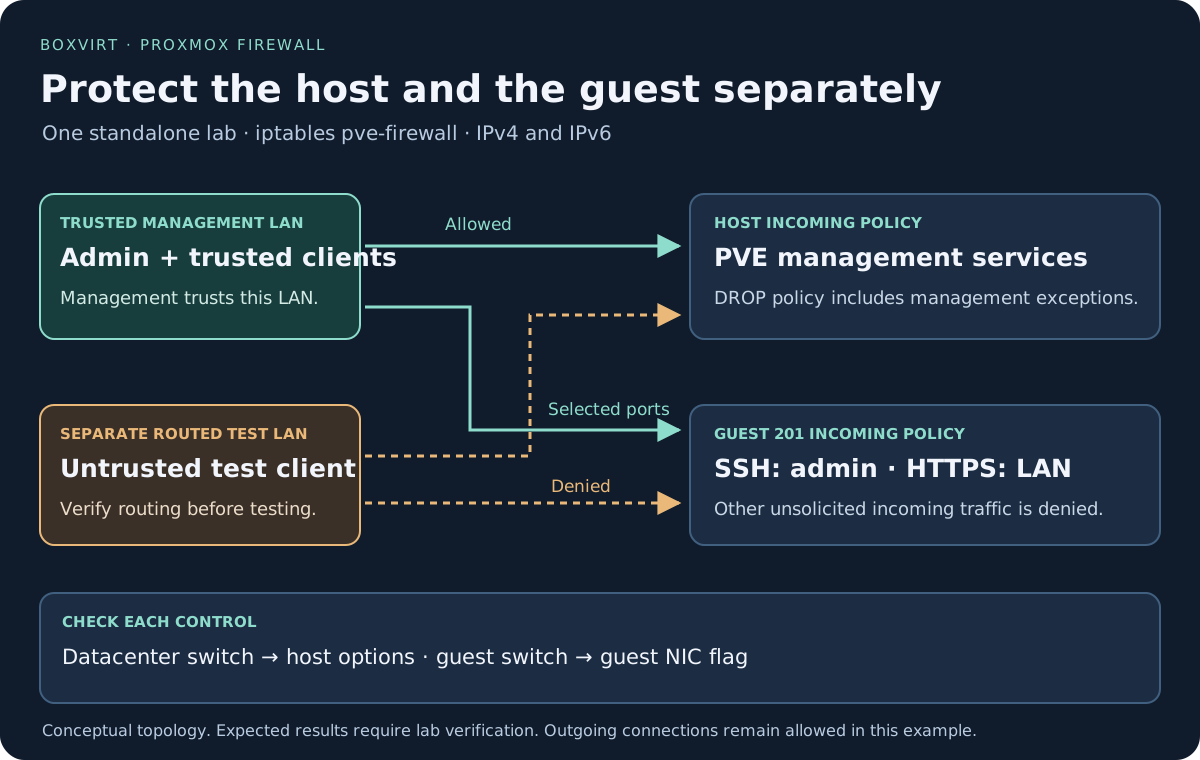
This walkthrough protects one standalone host and one Linux guest while trusting a dedicated management subnet. It does not promise to limit host management to a single computer on that subnet. Proxmox has built-in management exceptions that must be included in the access model.
Validation and backend: the sources were reviewed on November 8, 2026.
The official firewall manual
identifies itself as version 9.2.13. This guide uses the established
iptables-based pve-firewall backend. The alternative nftables-based
proxmox-firewall is described as a technology preview in that manual.
No firewall settings have been changed or tested on a lab host for this
article. Check the documentation for your installed build and rehearse the
procedure with an independent console before using it on a relied-on host.
If you need a guest for this exercise, create a Linux VM or an unprivileged LXC container first. Match the addresses and running services to the policy you intend to test.
Start with the access you actually want
Our illustrative lab has these addresses. They are documentation addresses, not a network you can paste into your installation unchanged.
| Role | IPv4 | IPv6 |
|---|---|---|
| Trusted management LAN | 192.0.2.0/24 | 2001:db8:10::/64 |
| Administrator device | 192.0.2.10 | 2001:db8:10::10 |
| PVE host | 192.0.2.20 | 2001:db8:10::20 |
| Linux guest, ID 201, on a services subnet | 203.0.113.50 | 2001:db8:30::50 |
| Separate routed test network | 198.51.100.0/24 | 2001:db8:20::/64 |
The guest already runs SSH and an HTTPS service. An external router provides the paths between management, services and test subnets; this PVE host is not acting as that router. The guest is deliberately outside the trusted management subnet. The existing routing preserves client source addresses and does not block the test earlier in the path. Otherwise, a failed connection would not prove that PVE made the decision.
The intended policy is:
- Management clients can reach the PVE management services. Clients outside the trusted management networks cannot establish those connections.
- Only the administrator device can initiate SSH to guest 201.
- Management-LAN clients can reach the guest’s HTTPS service.
- Other unsolicited guest traffic is denied, while the guest can initiate outgoing connections. This first policy does not restrict guest egress.
Keeping outgoing access allowed preserves a simple path for updates, DNS and time synchronization while you establish the incoming policy. Restricting egress is a separate change with its own dependency inventory.
Understand the four places you will check
| Location in the PVE interface | What it controls here |
|---|---|
| Datacenter → Firewall → Options | The overall firewall switch and datacenter input/output policies |
| Node → Firewall → Options | Whether this host’s firewall rules are enabled, plus host logging and backend settings |
| Guest 201 → Firewall → Options | Whether this guest’s rules are enabled, and its input/output policies |
| Guest 201 → Hardware → Network Device | The firewall flag on the VM NIC being protected |
For an LXC guest, inspect its network device in the container’s Network panel instead. Guest firewall rules are stored by guest ID for both VMs and containers, but each interface still needs its own flag.
IN means traffic arriving at the zone you are configuring. For the host,
it includes a connection to the host’s port 8006. For a guest, it means a
connection arriving at that guest. OUT means traffic leaving that zone.
The stock backend in this article does not implement the new host FORWARD
or SDN VNet firewall rules described for proxmox-firewall. A guest’s
incoming rule still protects its NIC; that is different from configuring a
general router-forwarding policy on the host. Do not copy nftables/VNet
examples into this recipe and assume they apply.
If you need help identifying the bridge or VLAN path first, use the Proxmox networking guide. A firewall rule cannot fix a guest attached to the wrong network.
1. Preserve a way back before enabling filtering
Use a physical console or independent remote console. Keep the current management session open as a convenience, but do not rely on it as your recovery path: an established connection can survive rules that prevent a new login.
Record the current datacenter, host and guest options, guest NIC flag and rule order. Keep a protected copy of the relevant configuration files:
| Configuration | Location |
|---|---|
| Datacenter options, IP sets and rules | /etc/pve/firewall/cluster.fw |
| This node’s options and rules | /etc/pve/nodes/<node-name>/host.fw |
| Guest 201 options and rules | /etc/pve/firewall/201.fw |
These paths explain where the GUI stores the policy. They are not an instruction to replace existing files wholesale. Guest NIC configuration is stored separately in the guest configuration, so save that setting too.
Inspect the detected local network on the PVE host:
pve-firewall localnet
Compare it with your intended management network. If it is unexpectedly broad, or the host sits directly on a public segment, stop and correct the design before following this LAN example.
Why the management IP set is not an exclusive allowlist
The special datacenter IP set named management provides built-in access
to host management services. The local/cluster network is also included
automatically. Adding one administrator address to that IP set does not,
by itself, revoke access from other local-network devices.
In this lab we deliberately trust the management subnet. In Datacenter →
Firewall → IPSet, create or review management and include both intended
management networks. Preserve required existing entries and understand the
automatically included network. The built-in host access includes more than
the GUI and SSH, such as console-related services.
If your actual requirement is “only this one workstation may administer the host,” use a separately verified design that addresses those implicit exceptions. Do not claim that shrinking the visible IP set alone achieved it. This article’s acceptance checks make the subnet trust explicit.
2. Enable the host policy in small steps
This staging sequence assumes a separate lab with no existing restrictive policy. On an already configured host, preserve its working protections and adapt the changes to that policy; do not broaden it simply to match these starting settings.
Stage the management IP set and any required host-service rules first. The host in this example offers PVE management services only. A host running additional network services needs explicit rules for them too.
At the datacenter level, confirm that the input policy is initially
ACCEPT while you stage the configuration, and keep output ACCEPT for
this example. At the node level, confirm that the host firewall option is
enabled and that the nftables option is No for this backend. Then enable
the datacenter firewall switch.
Inspect the status on the host:
pve-firewall status
This reads and compiles the PVE firewall configuration and can report configuration errors. Resolve any errors before tightening the policy.
Now set the datacenter input policy to DROP. The documented management
exceptions remain part of the host policy; this does not mean “drop every
incoming packet without exception.” Keep the independent console open and
immediately open new GUI and SSH connections from the management LAN.
Test the separate routed source as well.
Do not continue to the guest until the host results match the policy. On a cluster, datacenter settings affect multiple hosts; the single-host staging sequence here is not a cluster rollout plan.
3. Add the guest rules before switching its input policy
Open guest 201’s firewall panel. Add enabled incoming ACCEPT rules in this
order, with the correct source address family:
| Order | Source | Protocol | Destination port | Purpose |
|---|---|---|---|---|
| 1 | 192.0.2.10/32 | TCP | 22 | IPv4 SSH from the administrator |
| 2 | 2001:db8:10::10/128 | TCP | 22 | IPv6 SSH from the administrator |
| 3 | 192.0.2.0/24 | TCP | 443 | IPv4 HTTPS from the management LAN |
| 4 | 2001:db8:10::/64 | TCP | 443 | IPv6 HTTPS from the management LAN |
Leave the source port blank: the client normally uses an ephemeral source port. In the GUI, distinguish destination port from source port. Enable per-rule logging temporarily where it helps the test.
Use the guest firewall options to select input DROP and output ACCEPT.
Keep NDP enabled for this IPv6 example. Enable the guest firewall option,
then enable the firewall flag on its intended NIC. Confirm all required
levels are active; a valid-looking rule on a guest with an unchecked NIC
flag is not a working policy.
The following is the corresponding illustrative guest firewall file content, not a shell script or a replacement for an existing policy:
[OPTIONS]
enable: 1
policy_in: DROP
policy_out: ACCEPT
log_level_in: info
ndp: 1

[RULES]
IN ACCEPT -source 192.0.2.10/32 -p tcp -dport 22 -log info
IN ACCEPT -source 2001:db8:10::10/128 -p tcp -dport 22 -log info
IN ACCEPT -source 192.0.2.0/24 -p tcp -dport 443 -log info
IN ACCEPT -source 2001:db8:10::/64 -p tcp -dport 443 -log info
The snippet does not include the NIC flag, which belongs to the VM’s network device configuration. It also does not show existing groups, aliases or other options you may need to preserve.
Rule order matters. Read a matching allow rule in the context of the
complete policy, including earlier rules, groups and built-in handling.
There is no need to append a broad “allow everything” rule after defining
a DROP input policy.
Keep address assignment and essential control traffic working
This scenario uses static guest addresses. If your guest uses DHCP, enable the guest DHCP option as appropriate to that setup and verify address renewal. An existing lease can hide a failure until later. Do not assume that the same switch establishes every DHCPv6 or SLAAC requirement.
Proxmox’s documented NDP handling supports IPv6 neighbor discovery, router solicitation and receipt of router advertisements. The option allowing a guest to send router advertisements is a different setting; leave it off for an ordinary application guest.
ICMPv6 also carries error information such as Packet Too Big, needed for path MTU discovery. Preserve the required error handling and inspect the generated rules before adding broad ICMP drops. RFC 4890 explains why an IPv4-style blanket ICMP block is unsuitable for IPv6.
DNS queries initiated by the guest remain possible under the output policy
used here. Confirm name resolution anyway: a reachable address and a working
hostname are different checks. If you later adopt an output DROP policy,
inventory DNS, NTP, updates, backups and application dependencies first.
4. Verify both the permitted and denied paths
Use new connections for every row. For each denied test, prove that the same target service is available from an allowed source. A connection timeout alone might mean a missing route or stopped service.
| Source → destination | IPv4 expectation | IPv6 expectation |
|---|---|---|
| Management LAN → host GUI and SSH | New connection succeeds | New connection succeeds |
| Services or routed test network → host GUI and SSH | New connection denied | New connection denied |
| Administrator → guest SSH | New connection succeeds | New connection succeeds |
| Another management client → guest SSH | New connection denied | New connection denied |
| Management client → guest HTTPS | New connection succeeds | New connection succeeds |
| Separate routed test network → guest HTTPS | New connection denied | New connection denied |
| Guest → configured DNS and update endpoint | Resolution and connection succeed | Check the intended IPv6 path separately |
| Guest → local IPv6 gateway | Not an IPv4 test | Neighbor discovery and reachability work |
The host test deliberately permits the trusted management subnet. The stricter single-administrator test applies to the guest’s SSH service. Do not swap those expectations when documenting the result.
Test your application with its normal hostname and certificate validation. Do not bypass TLS checks just to make a firewall test appear successful. For dual-stack services, force IPv4 and IPv6 separately using an appropriate client so that fallback does not hide a broken family. Also perform a real transfer; a small successful request does not prove path MTU handling.
Record the client address, target address/port, protocol family, time and observed result. Compare those details with the firewall logs. If another device performs source NAT, check the source the PVE host actually sees: translating a test client into a trusted address changes the policy match. None of the expected outcomes above are claimed as measured results for this guide.
5. Use logs to explain a result
In the host or guest Firewall → Options, temporarily set the incoming
logging level to info, then inspect Firewall → Log. User-defined rules
have their own logging option. Setting a zone’s logging level does not
automatically enable logging on every custom rule.
Some built-in drops are intentionally not logged. Therefore, an empty log
is not proof that no firewall matched. Avoid treating debug as “log more
packets”: the documented level identifies log messages; it is not a
guarantee of wider packet coverage.
For diagnosis on the host, these read-only commands show the generated iptables and ip6tables rules:
iptables-save
ip6tables-save
Use them to check the relevant host or guest chain, address family and rule order. Do not edit generated chains as a permanent fix: the PVE service manages them from its own configuration.
| Symptom | Check first |
|---|---|
| Guest traffic is never blocked | Datacenter switch, guest enable option, intended NIC flag and correct guest ID |
| A non-admin can still reach the host from the same LAN | Built-in management/local-network exceptions; this lab trusts that subnet |
| SSH works but a new GUI login fails | Source seen by the host, address family, port and management IP-set entries |
| IPv4 is restricted but IPv6 still connects | IPv6 source rules, service AAAA address and the actual client path |
| Guest lost its address after a while | DHCP renewal or IPv6 address-configuration traffic |
| Small requests work but transfers stall | Path MTU and ICMP/ICMPv6 error handling |
| An old session works but a new one fails | Connection tracking versus the policy for new connections |
The official pve-firewall source
also helps explain generated default chains. Its master branch can change;
use the source matching your installed package when investigating a specific
machine.
Recover without losing the policy you meant to build
If the last change breaks access, use the independent console to restore the recorded setting or correct the specific source/rule that caused it. For a guest-only failure, return its policy or NIC setting to the saved state rather than changing every host’s firewall. If the datacenter input policy was the failing step on this single host, restore its previous setting while you inspect the management network and exceptions.
Do not flush all iptables rules or permanently stop firewall management as a troubleshooting shortcut. Restoring a previous permissive setting is a temporary recovery action; the intended protection is not complete until the allowed and denied tests pass again.
Keep the record of the successful rules, address families and tests. A firewall setup becomes useful evidence when you can show both what it allows and what it refuses, including the exceptions you deliberately trust.