Introduction: What is Proxmox VE and Why Does it Dominate in 2025?
Welcome to the definitive guide to Proxmox Virtual Environment (VE). In the ever-evolving world of IT, Proxmox VE has solidified its position as the leading open-source virtualization platform for homelab enthusiasts, small-to-medium businesses (SMBs), and even enterprise users. But what makes it so special?
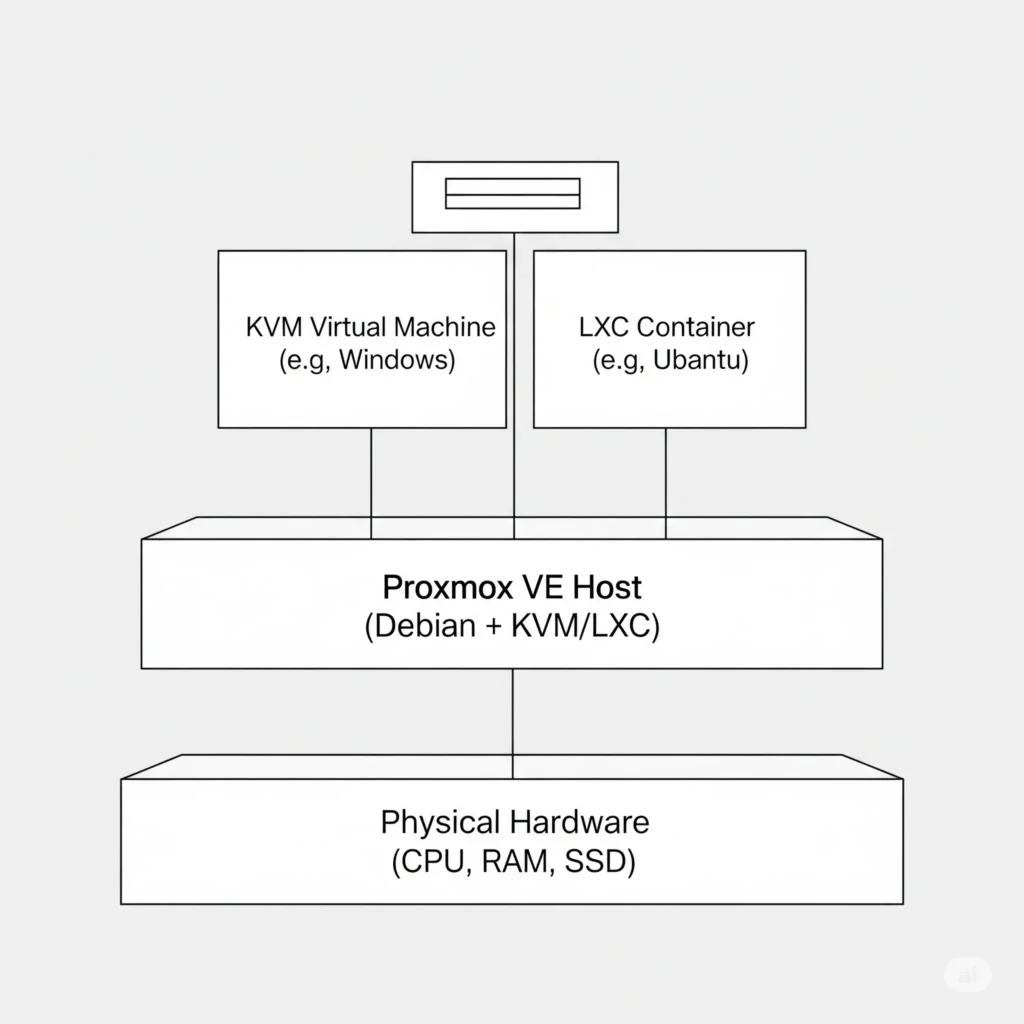
Proxmox VE is a powerful, all-in-one server management platform that seamlessly integrates two virtualization technologies: Kernel-based Virtual Machine (KVM) for heavyweight virtual machines (like Windows or full Linux distros) and Linux Containers (LXC) for lightweight, OS-level virtualization. Built on a rock-solid Debian GNU/Linux distribution and managed through a user-friendly web interface, Proxmox offers enterprise-level features like clustering, high availability, and software-defined storage, all completely for free.
This guide will walk you through every essential step, turning an empty server into a fully operational virtualization powerhouse.
Chapter 1: Planning Your Proxmox Server
Before you begin, proper planning is key. Your hardware choices will directly impact performance.
- CPU: A modern 64-bit CPU with virtualization support (Intel VT-x or AMD-V) is mandatory. More cores are better, as they can be assigned to different VMs.
- RAM: 8GB is the bare minimum for the host and a couple of small VMs. For any serious use, 16GB to 32GB is highly recommended.
- Storage: This is critical.
- OS Drive: A small, fast SSD (256GB+) is perfect for installing Proxmox itself.
- VM Storage: For your VMs, you have options. A large capacity SSD (NVMe is ideal) will provide the best performance. For bulk storage, traditional HDDs can be used, ideally in a RAID or ZFS configuration for data redundancy.
- Networking: A stable Gigabit Ethernet connection is a must. A second network card is recommended if you plan on creating a dedicated storage network or complex firewall setups.
Chapter 2: Step-by-Step Installation
Installing Proxmox is a straightforward process.
- Download: Grab the latest Proxmox VE ISO installer from the official website.
- Create a Bootable USB: Use a tool like BalenaEtcher or Rufus to create a bootable USB drive from the downloaded ISO file.
- Boot and Install: Boot your server from the USB drive. The graphical installer will guide you through the process. You’ll need to agree to the EULA, select your target hard drive for the installation, and set your country, time zone, and a strong root password.
- Network Configuration: The final step is configuring the network. You will set a hostname, a static IP address, gateway, and DNS server. Double-check these settings, as this is how you will access the web interface.
- Reboot: Once the installation is complete, remove the USB drive and reboot the server.
Chapter 3: A Tour of the Proxmox Web UI
Once your server has rebooted, open a web browser on another computer and navigate to https://Your-Proxmox-IP:8006. You will see a login prompt. Log in with the username root and the password you set during installation.
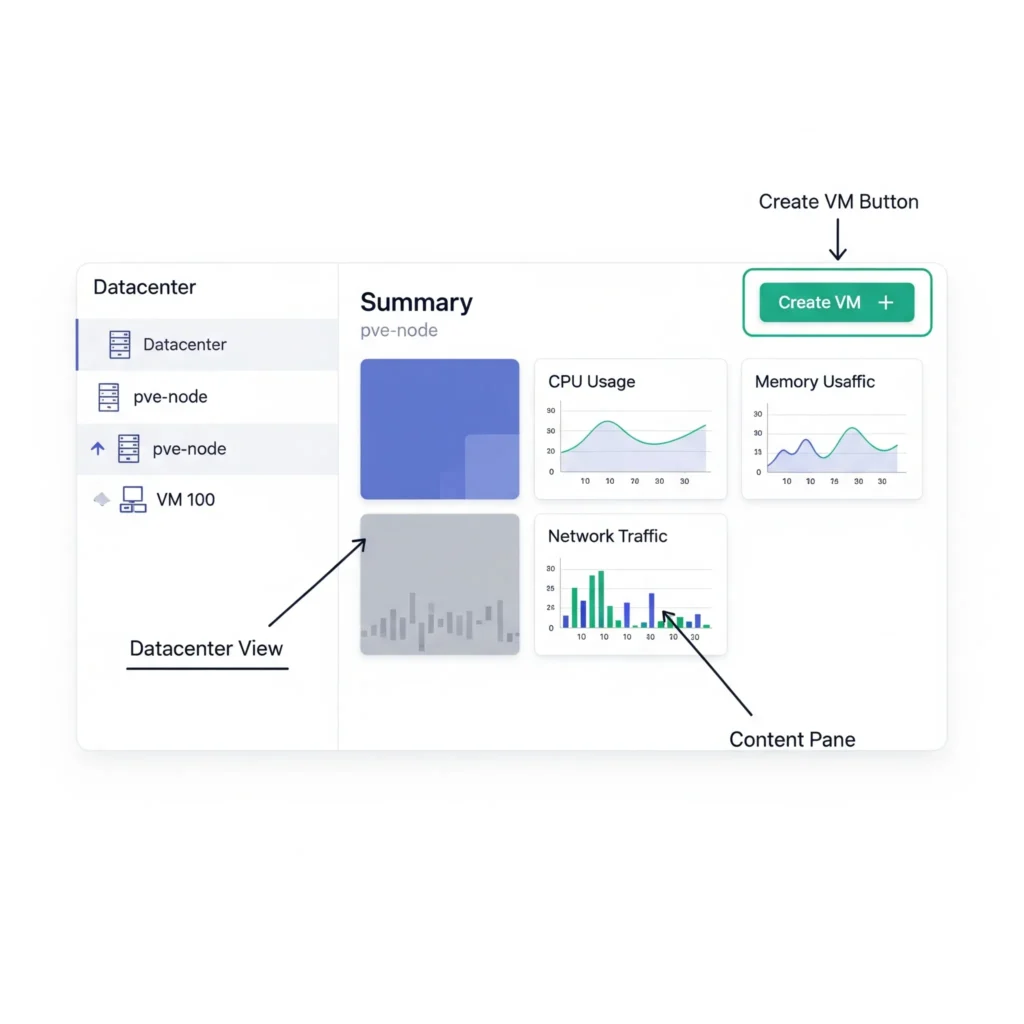
The interface is divided into several key areas:
- Datacenter View (Left Pane): This tree view shows your entire setup, from the datacenter level down to individual nodes, storage pools, and guest VMs/containers.
- Top Header: Shows search, user controls, and buttons for creating new VMs, containers, and other tasks.
- Content Pane (Center): This is where you’ll spend most of your time. It displays detailed information and configuration options for whatever item you’ve selected in the left pane.
Chapter 4: Proxmox Networking Explained
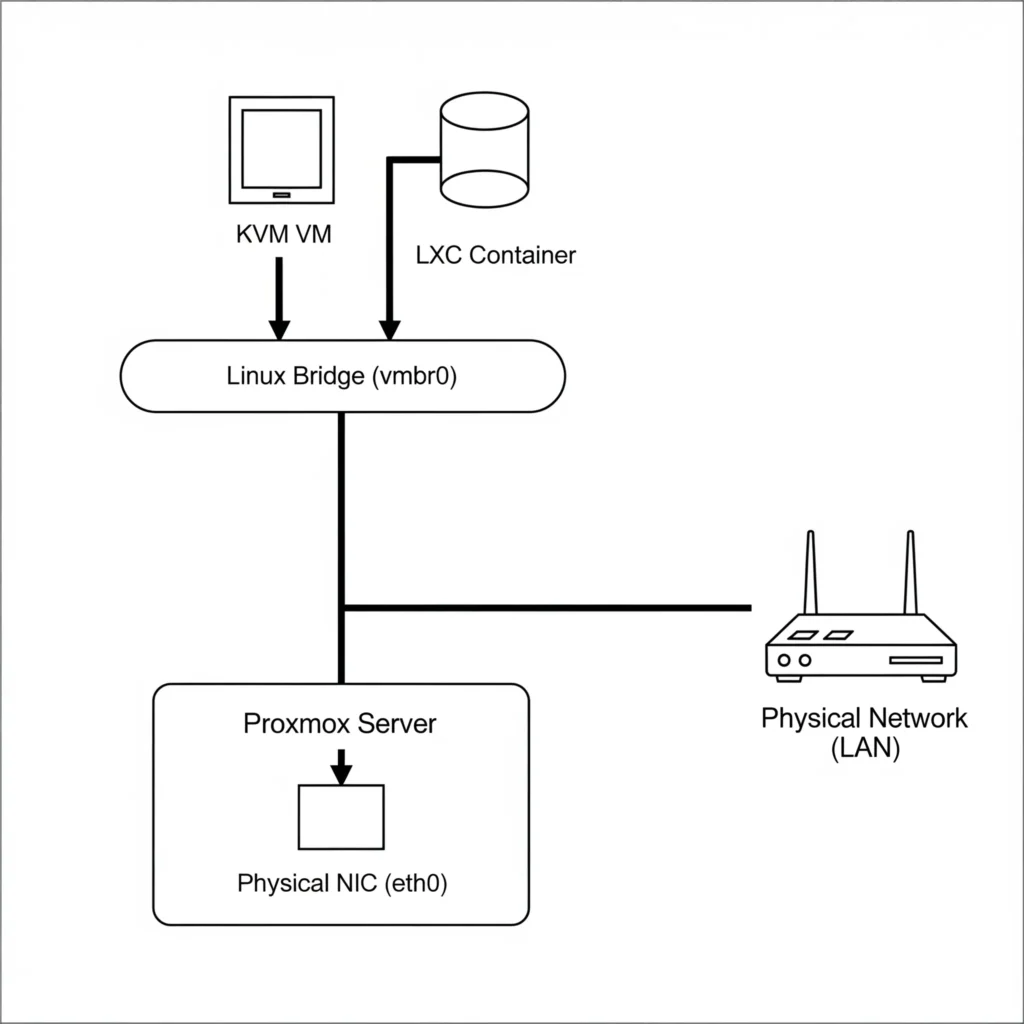
Proxmox uses a powerful and flexible software-defined networking model. The most common component is the Linux Bridge (vmbr0 by default). Think of it as a virtual network switch. Your server’s physical network card and all your VMs’ virtual network cards are «plugged into» this bridge, allowing them to communicate with each other and your physical network.
For more advanced setups, Proxmox also supports Linux Bonds (combining multiple physical NICs for speed or redundancy) and VLANs (for segmenting network traffic).
Chapter 5: Configuring Storage
Storage is where your VM disks and ISO images live. Proxmox supports numerous types:
- Local Storage: LVM (default for VM disks) and Directory (default for ISOs and templates).
- Network Storage: NFS and iSCSI are popular choices for connecting to a NAS.
- Advanced/Clustered Storage: ZFS (a powerful combined file system and volume manager) and Ceph (for distributed, highly available storage) are integrated directly into the platform.
Chapter 6: Deploying Your First VM and LXC Container
Let’s create our first guest!
- To Create a KVM (Full VM):
- Ensure you have an OS installation ISO uploaded to your local storage.
- Click «Create VM» in the top right.
- Follow the wizard: give it a name, select the ISO, configure CPU, memory, and hard disk size.
- Once created, start the VM and complete the OS installation through the built-in console.
- To Create an LXC (Linux Container):
- Download a container template first. Go to
local storage->CT Templates, clickTemplates, and download a distribution like Ubuntu or Debian. - Click «Create CT».
- The wizard is similar but simpler. You’ll set a password, select the template, and configure the network.
- Containers are created in seconds and are ready to use immediately.
- Download a container template first. Go to
Chapter 7: Backups & Snapshots — Your Safety Net
Never run a server without a backup plan. Proxmox makes this easy.
- Snapshots: An instant «picture» of a VM’s state. You can roll back to a snapshot in seconds if a change goes wrong. However, a snapshot is not a backup.
- Backups (VZDump): Proxmox’s built-in backup tool. You can create full, compressed backups of your VMs and containers to any configured storage. You can run backups manually or, more importantly, schedule them to run automatically every night.
Conclusion: Your Journey Begins
Congratulations! You’ve gone from a bare metal server to a fully functional virtualization host. You’ve installed Proxmox, explored its interface, and deployed both a VM and a container.
You are now equipped with a powerful platform to build your homelab, run self-hosted applications, or even manage a small business’s IT infrastructure. The next steps in your journey could be exploring advanced topics like Proxmox clustering, high availability, or diving deeper into automation with tools like Terraform and Ansible. The possibilities are endless.